Syncing audio and video plays an essential role in getting clear and engaging content. If your video content is concise and provides sound clarity and video quality together, then you can attract a large number of audiences. You can manually sync the sound and video or auto sync video and audio; the choice is entirely up to you. Confused about which one to use, or which one is the best according to your needs?
Well, simply delve into this article to clear all your doubts and find the best type of synchronization to get stunning video content.
Part 1: What is Video Syncing?
Video syncing is a technique for aligning audio tracks with video footage. The main purpose of syncing is to create a seamless viewing experience where audio and video work together in harmony. To make it more clear about video syncing, we are providing you with why it’s important, so let’s have a look!
– With the help of audio and video syncing, you can create a smooth visual flow for a seamless experience to get viewers’s attention.
– If audio and video are properly aligned, then it becomes easy to understand the message and the story being conveyed.
– Syncing helps you provide detailed attention and high quality for professional-grade video production.
– It may reduce errors and mistakes during post-production, such as lip sync issues and misaligned audio tracks.
– With accurate syncing, it becomes easier to make changes to the audio and video components without affecting the rhythm and overall timing of the video content.
– Precise syncing creates an effective sound design to get more interesting experiences.
There are several tools accessible online to sync video and audio flawlessly. Syncing can be done manually and can auto-sync video and audio effortlessly. It all depends on your goals and requirements, whether you opt for manual or auto-syncing for your audio and video.
Part 2: Auto Sync vs. Manual Sync: Which Brings Better Results?
It might be difficult when opting for the manual or automatically sync audio and video option. To know which one brings better results, we need to know about their pros and cons so that you can get clarity on which one will go according to your goals and requirements.
Auto Syncing
We are describing the pros and cons of the audio and video synchronization automatically.
Pros:
– Saves time and effort, particularly when dealing with large amounts of footage.
– Auto-synchronization options are designed to provide accurate results that reduce the risks of human error.
– It maintains consistency across multiple clips while ensuring the audio and video remain synchronized throughout the project.
Cons:
– Auto sync may not offer fine-tuning or adjustments to the sync points that can limit creative control.
– It may not work well with unusual or complex audio and video elements.
– Sync audio to video automatically can still make mistakes if audio and video are not properly aligned and there is some problem with the video footage.
Manual Syncing
If you want to match audio to video manually, then you must consider its pros and cons.
Pros:
– With manual syncing, you get precise control over sync points to make adjustments and fine-tune the audio-video elements.
– It provides flexibility to work with unusual and complex audio-video elements that can’t be done with auto synchronization.
– Opting for manual syncing requires detailed attention that ensures every sync point is accurate and deliberate.
Cons:
– For large videos, manual syncing can be time-consuming.
– In manual syncing, there are chances of human error that require a double-check of the work to ensure accuracy.
Part 3: Wondershare Filmora: A Perfect Fusion of Auto & Manual Sync
Well, finding software that goes perfectly with your job can be a difficult task. So, we are here to provide a tool that can help you in every manner for the desired outcomes. Let us quickly present the tool: Wondershare Filmora. This tool is a complete suite of audio and video editing, which offers you seamless syncing of audio tracks and video footage.

Key Features:
– With its user-friendly and intuitive interface, you can synchronize sound with video manually and automatically with ease.
– You don’t worry about the device because it works well with Macs and Windows.
– Free version allows you to sync video and audio precisely.
– Offers various export options for video files, including MOV, MP4, AVI, and more.
– Provides easy and automatic sync of multiple audio tracks.
– Comes with cloud storage to save large numbers of files without affecting the system storage.
So, if you want to learn how it works for manual and auto-syncing, simply go through its step-by-step guide.
Manual syncing
Step 1: Download and launch Wondershare Filmore on your device, then navigate to Open > New Project > Import to get the files you want to edit.
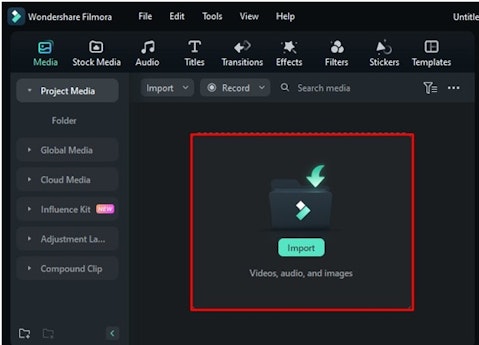
Step 2: Once you import the files, drag and drop these files to the editing area. Here, you will see that the spikes are not aligned.

Step 3: To sync both files, you need to align the files as shown in the image below.
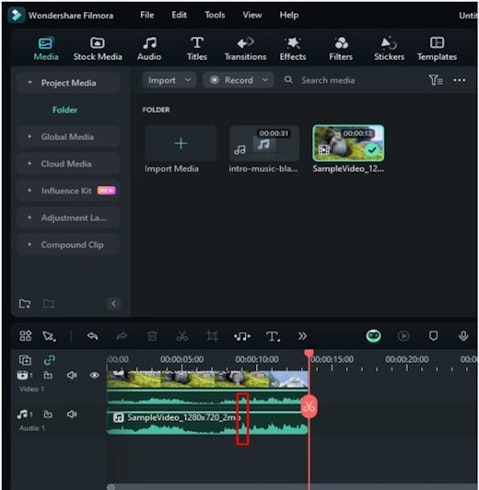
Step 4: After aligning the audio and video accurately, right-click on the video and select the Detach Audio option to detach the audio from the video.
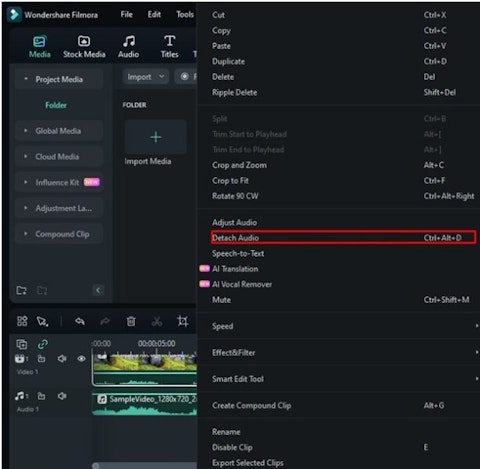
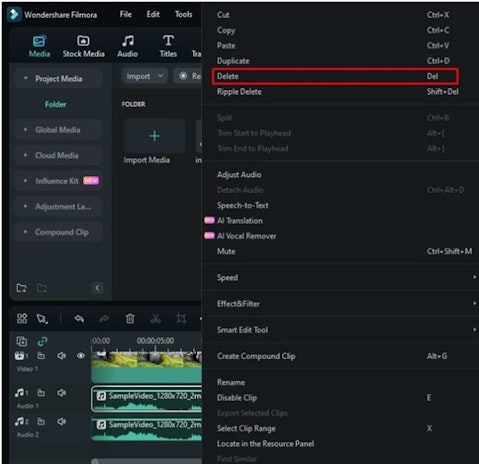
Step 5: Then again right-click on the audio that you have detached from the video and select the Delete option to delete.
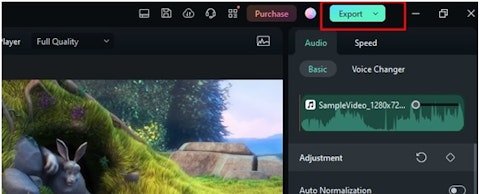
Step 6: If your editing process is done, click the export option to save the changes you have made to your video content.
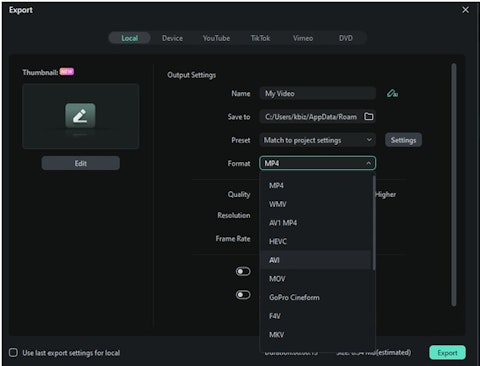
Step 7: Once you click the export button, you will navigate to the Local option, where you can select the format according to your needs.
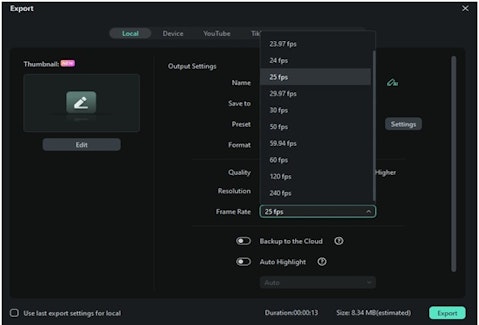
Step 8: You also get many options for frame rate, so select the Frame Rate that suits your desired video quality and click on the Export button again to make the final changes to your video project.
Auto Sync
The process of auto-sync is quite simple; you just need to import and drag-and-drop the files in the timeline as shown in the manual syncing.
Step 1: You will see the Auto Synchronization icon in the custom toolbar; simply click on it to sync your audio and video.
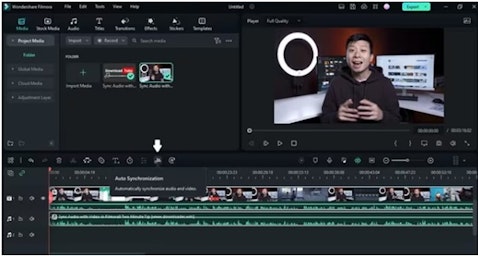
Step 2: Once you click the auto synchronization icon, the process will start, so wait for a few seconds to get the process done, and your audio and video will be synchronized accurately. Once you make the changes to your video, export the file while clicking on the Export option.
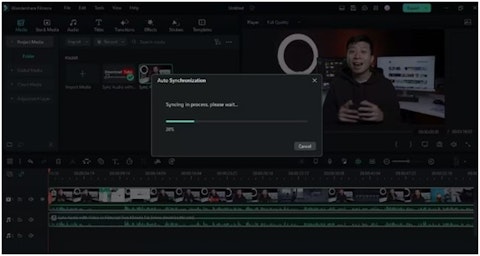
Hope, you find manual and auto-syncing fun using Wondershare Filmora. If you want to explore more about its auto-synchronization feature, simply click here.
Conclusion
So, while going through the article till the end, you learn all the facts about syncing manually and automatically. Hope there will be no question about which option is good for synchronization: manual or auto. Though you can use any audio synchronizer software, opting for Wondershare Filmora will be the best. This tool provides both options on a single platform for effortless yet engaging work. So, try its free version to explore it before opting for its subscription.
FAQs
1. Can auto-syncing handle video footage with multiple audio tracks?
Yes, many tools like Wondershare Filmora can handle multiple audio tracks for complex audio-visual projects.
2. Can I fine-tune the sync after auto-syncing of audio and video?
Many synchronizers help you fine-tune the sync points manually. This might be useful if you need to make adjustments for technical reasons.
3. Is it possible to use third-party software for auto-syncing?
Yes, Wondershare Filmora provides seamless auto-syncing of audio and video.
Disclosure: Insider Monkey received compensation in exchange for publishing this article. Insider Monkey doesn’t recommend purchase/sale of any securities. Please get in touch with a financial professional before making any financial decisions. You understand that Insider Monkey doesn’t accept any responsibility and you will be using the information presented here at your own risk. You acknowledge that this disclaimer is a simplified version of our Terms of Use, and by accessing or using our site, you agree to be bound by all of its terms and conditions. If at any time you find these terms and conditions unacceptable, you must immediately leave the Site and cease all use of the Site.
Disclosure: Insider Monkey received compensation in exchange for publishing this article. Insider Monkey doesn’t recommend purchase/sale of any securities. Please get in touch with a financial professional before making any financial decisions. You understand that Insider Monkey doesn’t accept any responsibility and you will be using the information presented here at your own risk. You acknowledge that this disclaimer is a simplified version of our Terms of Use, and by accessing or using our site, you agree to be bound by all of its terms and conditions. If at any time you find these terms and conditions unacceptable, you must immediately leave the Site and cease all use of the Site.