Color grading with 3D LUTs (Lookup Tables) has become a vital step for photographers seeking to improve their visual narrative. These technologies allow us to precisely alter the color and tone of photos, giving us the ability to communicate a certain mood or style. 3D LUTs bridge the gap between our creative vision and the finished image, whether they emulate the appearance of old film stock or create a distinctive color profile.
The use of 3D LUTs in the digital workflow makes color grading more accessible and time-efficient. This allows us to maintain similarity between pictures and projects, guaranteeing that our work satisfies professional expectations. In a highly competitive market, the ability to effectively use 3D LUTs may substantially improve the quality and impact of videos.
In this article, we will show you some tips and tricks about 3D LUTs in post-production along with the best practices.
Part 1: Understanding 3D LUTs and Its Types
Look-up Tables, or LUTs, are tools that may be used during the pre-production, production, and post-production stages; however, they are most usually associated with post-production. A LUT may be used for a variety of purposes, including providing an artistic appearance to a picture, translating video from one color space to another, and calibrating monitors on set. LUTs are used by everyone, including the director of photography, video editor, and colorist.
LUTs are just a huge set of numbers that remap the values of a picture to modify its appearance. More realistically, LUTs function as filters that may be applied to pictures to get the desired result. There are several LUTs, each of which achieves a distinct aim.
Types of 3D LUTs
3D LUTs have multiple types which are used in different types of visuals. Below are some types of it.
1. Technical LUTs
The technical LUT is a popular post-production tool for converting video from one color space to another. Colorists or finishers can use a technical LUT to convert Rec. 709 footage, the standard color space for high-definition video, to DCI XYZ, the color space used in digital cinema projection. You may also hear this called a transition LUT.
2. Lighting LUTs
Film emulation 3D LUTs are a result of the accurate matching of high-quality scans of film stock with digital content. The film emulation LUTs are the closest thing to approximating the properties of a real film stock since they match hundreds, if not thousands, of unique colors.
3. Speed LUTs
Also known as log normalization. LUTS, or speed LUTs, convert video from a cinema camera’s log color profiles to more conventional color spaces, such as Rec. 709.
Log color profiles capture footage in a high dynamic range, allowing for more flexible color adjustment. Yet, the footage looks to be particularly flat as it comes out of the camera. Common log profiles include Sony’s sLog, Canon’s cLog, Red’s REDLogFil, and Blackmagic’s Log.
4. Creative LUTs
Creative LUTs are the most well-known (and entertaining) on the list. They are employed to give an image a distinct appearance, feel, or aesthetic. When color grading, they may be applied directly onto film, similar to a filter on a social media app, to artistically alter the appearance in many ways.
Part 2: Best Tips and Tricks For 3D LUTs For Better Results
Having some special tips and tricks about 3D LUTs can help users a lot in doing video editing including LUTs. Here we will show you some tips about 3D LUTs to use for better results.
Combining LUTs
LUTs don’t have to be used alone; they may be combined to give your film a distinct appearance. This is one of our favorite ways to use LUTs since it can make your color grading pop.
Using an Adjustment Layer
A nice method to utilize LUTs is to use one as a finishing LUT. Once your timeline is configured, you may apply the LUT to all of your videos to give them a consistent tone. A decent way to achieve this is to edit all of your footage on the timeline.
Using LUTs as Masks
Masks may be quite useful while editing. You can create distinct looks by directing the viewer’s gaze to a specific area of the frame or to elicit a specific emotion. A particularly good method is to use warm colors in the center of your frame and cold colors on the edges, or vice versa, depending on your setting.
Understand LUTs
Before using any LUT, it’s important to understand exactly what it accomplishes. LUTs are mathematical algorithms that change the color and tone values in your video; understanding their impact allows you to forecast how they will affect your film.
Test Several LUTs
Trying out multiple LUTs on your film might lead to unexpected outcomes and creative choices. Don’t restrict yourself to a single LUT too fast; give others a chance and select what looks best for your project.
Learn How to Create your LUTs
To get the most out of LUTs, consider learning how to make your own. This personalizes your films and allows you to build a distinct color grading style for your work. There are various tutorials available to help you create your LUTs, which can substantially improve your video production abilities.
Part 3: Get Your Video to The Next Level 3D LUTs with Wondershare Filmora
Wondershare Filmora is video editing software that simplifies the process for you. Filmora is suitable for both beginners and expert editors. Filmora’s advanced color processing tools stand out. You may tweak, modify, or completely recreate the color tone of your video clip.
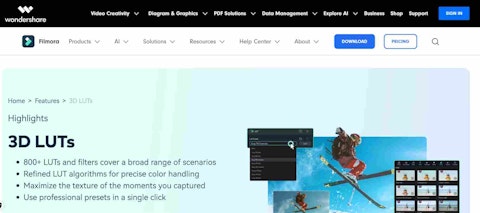
Recently, the video editor improved its game by adding specific Filmora 3D LUTs. This adds a completely new level to color grading your films. You may now use several 3D LUTs for Filmora on your videos directly. Each preset offers a distinct color grade that may substantially improve the appearance of your movie.
Features of Filmora 3D LUTs Feature
– 800+ LUTs Available:
Filmora features over 800 LUTs and filters. From innovative color grading to vintage-inspired Fuji style and cutting-edge cinematic effects.
– Pro-level Color Grading:
Filmora allows you to preserve color and light information, keep your distinctive camera style, and optimize the texture of your material.
– Enhanced Colors:
Filmora employs complex algorithms to make exact color modifications, such as deepening, eliminating certain hues, and refining highlights and shadows, guaranteeing that your pictures stand out with unprecedented realism and depth.
– Use Professional Presets:
Easily explore and select from a variety of specialized filter categories. Achieve professional-level results with a single click, saving you the hassle of dealing with complicated parameter modifications.
Step-by-step Method to Use 3D LUTs with Filmora
Here are step-by-step methods of using Filmora 3D LUTs in the video.
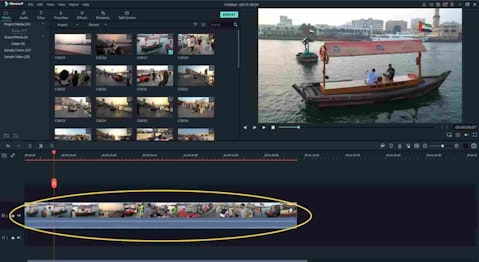
Step 1: Import the Video:
You can import or simply drag and drag your video onto the timeline, then click to select it for an upcoming process.
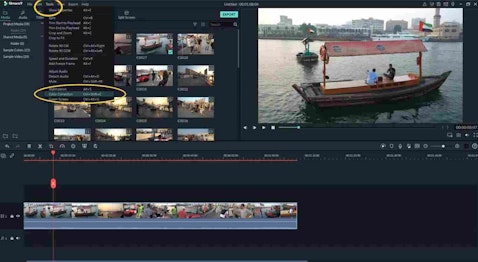
Step 2: Go to ‘Tools’, then ‘Color Correction’:
Click on ‘Tools’, then ‘Color Correction’ to open a window where you can import LUTs.
Step 3: Click on ‘3D LUT’:
This will bring up the LUT importer drop-down.
Step 4: Selecting the LUT:
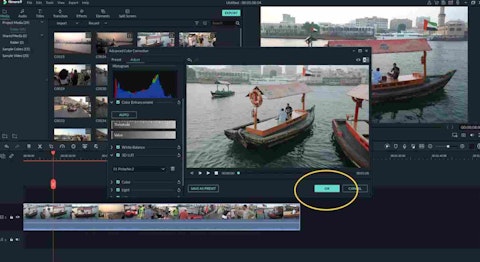
From the drop-down, select ‘Load new LUT’ OR use already-made LUTs in the Filmora. You can also make changes to the LUTs like adjusting light, color, HSL, and Vignette. So, You can easily choose your LUT after that.
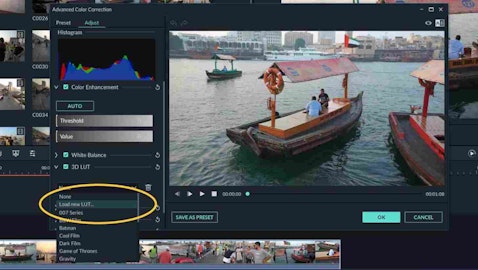
Step 5: Applying the LUT and Save the Project:
After you’ve picked the LUT, click the ‘OK’ button. Now, preview the video and save it.
Conclusion
3D LUTs are an effective tool for improving the visual storyline and color grading of your films. You may advance your video production by learning the many kinds of LUTs and how to apply them efficiently. Wondershare A simple-to-use platform for applying 3D LUTs and getting results on par with pros is provided by Filmora.
Filmora’s sophisticated color processing tools and selection of more than 800 LUTs make it simple to try out various aesthetics and appearances to choose which one is best for your production. You may maximize the effects of 3D LUTs and improve the quality of your video footage by heeding the advice and techniques provided in this article.
Disclosure: Insider Monkey received compensation in exchange for publishing this article. Insider Monkey doesn’t recommend purchase/sale of any securities. Please get in touch with a financial professional before making any financial decisions. You understand that Insider Monkey doesn’t accept any responsibility and you will be using the information presented here at your own risk. You acknowledge that this disclaimer is a simplified version of our Terms of Use, and by accessing or using our site, you agree to be bound by all of its terms and conditions. If at any time you find these terms and conditions unacceptable, you must immediately leave the Site and cease all use of the Site.